Impress Family at this Year’s Feast…Cranberry Sauce

It’s the time of year to get your Thanksgiving dinner assignment.  If you’re the person who always volunteers to bring the rolls or the crackers and cheese, up your game this year and bring a feast essential…the cranberry sauce.  If you can boil water, you can make this recipe. Think of how impressed your family will be?

I’d never made cranberry sauce before but Eric brought home a fresh bunch of berries from the farmer’s market and I figured it was time to learn.

Cranberry Sauce

  • 1 pound fresh cranberries, washed and dried
  • 2 cups sugar (I used 1 1/2 cups cane sugar)
  • 1/3 cup water
  • 1 cinnamon stick
  • 1/2 teaspoon ground allspice
  • 1/4 teaspoon ground nutmeg
  • 1 orange, zested and juiced ( I omitted and it still tasted fine)
  • A pinch of love

WP_20141027_001

Stir the cranberries, sugar and water together in a small sauce pan. Bring the mixture to a boil on medium heat. Some of the cranberries will start to burst.

WP_20141027_003

Once the mixture comes to a boil, reduce to a simmer, add the cinnamon, nutmeg and allspice. Let the sauce simmer for about 10 minutes.  Stir in the orange juice, zest and love.

WP_20141027_004

This is a great dish to make ahead of time and it lasts for a while in a well sealed container in the refrigerator. Enjoy!

Soup’s On Sunday…Roasted Butternut Squash Soup

WP_20141109_002

Butternut squash soup is delicious. Roasted butternut squash soup is even better…packing a little extra flavor punch.  This is my soup of the week that will make for great lunches and dinners at work.

Roasted Butternut Squash Soup

  • 1 butternut squash, peeled, seeded and cubed
  • 1/2 yellow onion, diced
  • 1/2 shallot, diced
  • 3 stalks celery, diced
  • 3 carrots, peeled and diced (I chopped a bunch of baby carrots)
  • 2 cloves garlic, minced
  • Olive oil
  • Salt
  • Pepper
  • 2 tablespoons butter
  • 6 cups low sodium chicken broth (use vegetable broth for vegetarian recipe)
  • 1 tablespoon Worcestershire sauce
  • 3 tablespoons brown sugar
  • 1 teaspoon nutmeg
  • 1/2 cup half and half
  • A pinch of love

WP_20141109_010Spread the cubed squash on a baking sheet, drizzle with olive oil and season with salt and pepper. Roast at 425 degrees until squash is soft and begins to turn golden brown.

WP_20141109_007

While the squash is roasting, melt the butter in the bottom of a large soup pot. Add the onion and let simmer until the onions and shallots are translucent. Add the garlic, celery and carrots. Cook at medium-low until all the veggies are tender.

WP_20141109_012

Add the roasted squash and chicken broth to the onion mix.  Bring to a boil and then simmer for 25 minutes.  Puree the soup with a hand blender until smooth.

WP_20141109_013Add Worcestershire sauce, brown sugar, nutmeg, half and half, and love to the pureed soup. Stir.  Serve warm or cool and refrigerate for delicious lunches all week long.

Enjoy!

Fun with Flatbreads….Snacks, Apps, Dinner, or Just Because

WP_20141026_017 (1)Flatbreads are everywhere.  They’re the new cool pizza.  Often lighter than pizza, flatbreads are great way to experiment with new flavor combinations. Serve up as a snack, a festive appetizer, for dinner, or just because.

Last weWP_20141026_012ekend we made two kinds of flatbreads: One with fig and prosciutto topped with Gorgonzola cheese, and a second one that was more of an experiment, topped with a roasted cauliflower, chicken, kale and goat cheese.

Fig and Prosciutto Flatbread

  • 2 flatbreads (I like the Naan breads or the Whole Foods brand)
  • Olive oil
  • Fig spread or jam (I use the Trader Joe’s Fig Butter)
  • A few slices of thin sliced prosciutto, cut into pieces
  • Crumbled Gorgonzola cheese
  • A few springs of fresh rosemary, finely chopped (I only had dried on hand)
  • 3 green onions, chopped
  • A pinch of love

WP_20141026_014Place your flatbreads on a baking sheet or pizza stone and coat lightly with olive oil. The fig spread acts as your sauce.  Spread on a layer, leaving a little gap along the edge of the flatbread (like pizza crust).  Add the prosciutto and rosemary.  Top with Gorgonzola.  It’s a very powerful cheese so a little goes a long way.  Sprinkle with love and bake at 425 for 15 minutes or until the flatbreads crisp and cheese starts to melt. Before serving, sprinkle the green onions on top. Let cool before cutting into slices.  Enjoy!

Chicken, Cauliflower and Kale Flatbreads

WP_20141026_002You never know what you’re going to find at your local farmers market.  Last week, Eric came home with orange and purple heads of cauliflower…who knew!?  Instead of using pizza sauce on this flatbread, I roasted the cauliflower and pureed it. It was a hearty, earthy base for a delicious flatbread creation.

  • 2 cups of cauliflower florets
  • 1/2 yellow onion, chopped
  • 3 cloves garlic, mashed
  • Olive oil
  • Salt and pepper
  • 2 flatbreads
  • Kale
  • Sliced chicken breast (cooked)
  • A few springs of fresh rosemary, finely chopped (I only had dried on hand)
  • Goat cheese (soft or crumbled)
  • A pinch of love

WP_20141026_003To roast the cauliflower, wash the heads and chop off all the florets.  Put the florets, chopped onions and a few mashed cloves of garlic on a baking sheet, drizzle with olive oil and sprinkle with salt and pepper.  Roast at 425 degrees for about 30 minutes or until the cauliflower is golden brown and easily pierced with a fork.

Let theWP_20141026_007 roasted cauliflower cool for a bit and put it into the food processor.  Drizzle with a tablespoon of olive oil and puree.  The consistency will be gritty, not as smooth as mashed cauliflower. Set aside until you’re ready to make your flatbreads.

Place your flatbreads on a baking sheet or pizza stone and coat lightly with olive oil. Spread the cauliflower puree on like you would pizza sauce, leaving a tiny gap along the perimeter of the flatbread for the crust. Add a layer of chopped kale and then thinly sliced chicken breast. Sprinkle with rosemary and top with goat cheese and a pinch of love.

WP_20141026_015

Bake at 425 for 15 minutes or until the flatbreads crisp and cheese starts to melt. Let cool for a few minutes before slicing and serving. Enjoy!

Add This to Your Winter Line Up…Chicken and Roasted Veggies Soup

WP_20141020_013It’s officially soup season. Each week we’re cooking up a pot of goodness for lunches and dinners at work.  Paired with a slice of hearty bread from the  local bakery and you’ve got a warm hearty meal.  My manager and fellow foodie shared this recipe last winter and I never got around to trying it.  I finally made it this week and it’s a new favorite.  This is full of shredded chicken, great herbs and yummy root veggies.  What makes this soup different from other chicken soup recipes is you actually puree some of the veggies and add it into the broth for a thicker, creamer consistency.

This recipe comes from a fellow blogger. As she points out, this a great way to use up leftover chicken if you’ve cooked a whole bird or purchased a rotisserie chicken.  I didn’t have any leftovers so I just boiled up a few pieces, shredded them and let them absorb lots of flavor from the broth and herbs before adding the rest of the ingredients to the soup.

Chicken Soup with Roasted Vegetables

  • 2 garlic cloves, minced
  • 2 carrots, peeled and cubed
  • 1 cup butternut squash, peeled and cubed
  • 1 small sweet potato, peeled and cubed
  • ½ yellow onion, quartered
  • 2 tablespoons extra virgin olive oil
  • 4 cups chicken stock, store-bought or homemade
  • 2-3 cups leftover shredded chicken or 1 pound uncooked chicken breasts
  • ¾ teaspoon dried parsley (I opted for a generous portion of fresh parsley)
  • 1 teaspoon sea salt
  • ½ teaspoon dried thyme
  • ½ teaspoon dried rosemary
  • ¼ teaspoon dried oregano
  • ¼ teaspoon cracked pepper
  • 1 cup water
  • 2 cups baby spinach (I used kale)
  • A pinch of love

WP_20141020_002Put the garlic, carrots, squash, sweet potato and onion on a cookie sheet. Drizzle with olive oil and sprinkle with salt and pepper. Roast in a 425-degree oven for 25 minutes or until the veggies are golden brown and soft.  You may want toss half way through roasting to ensure everything cooks evenly.

WP_20141020_007

In a medium soup pot, warm chicken stock/broth and dried herbs. Add in shredded chicken.

WP_20141020_008When the veggies are done roasting, puree half of them (include all the onions) with 1 cup of water in the food processor. Add the puree and the remaining roasted vegetables into the soup pot.

WP_20141020_011

Bring to a boil, then let simmer for 25-30 minutes. Season with salt and pepper to taste. Don’t forget the pinch of love. A few minutes before serving, add in the greens and any fresh herbs you’re using. Dish out some hearty portions and enjoy!

There’s Pumpkin in My Risotto…and I Like It

The pumpkin madness continues…

WP_20141019_014So many recipes call for just part of a can of pumpkin. If you don’t plan, the remaining pumpkin will sit forgotten in the back of the fridge.  Such a sad fate for delicious pumpkin. This recipe is great for that pumpkin puree leftovers!  A little pumpkin, some nutmeg and lots of love make this a warm, hearty fall dinner, packed with flavor. I used a Food & Wine recipe for inspiration, but took a lot of liberty, changed quantities and made it my own.

Pumpkin Risotto with Roasted Butternut Squash

  • 1/2 of a butternut squash, peeled, seeded, chopped
  • 3-4 tablespoons olive oil
  • 1 shallot, chopped
  • 1/2 large white onion, chopped
  • 1/2 can pumpkin puree
  • 1 1/2 teaspoon nutmeg
  • 1 teaspoon white pepper
  • 4 tablespoons (1/2 stick) butter
  • 1 cup arborio (risotto) rice
  • 4-5 cups low-sodium chicken broth/stock
  • 1/3 cup shredded parmesan
  • Salt and pepper to taste
  • A pinch of love

WP_20141019_003

Heat chicken broth/stock in a small sauce pan. I used one carton of chicken stock. Stock tends to have less sodium.

On a cookie sheet, spread out the chopped butternut squash and drizzle with olive oil, sprinkle with salt and pepper. Roast at 425 degrees for 25 minutes or until squash is golden and soft.

WP_20141019_002

While the squash cooks, warm 2 tablespoons of olive oil in a large skillet. Add in the chopped shallot and onion. Cook until soft. Stir in the pumpkin, nutmeg and white pepper.

Push the mixture to one side of the pan. In the open space, melt the butter and brown the dry rice for about 3 minutes. Stir the rice and pumpkin mix together.

WP_20141019_005This is when the fun begins. Anyone who has made risotto before knows it’s a careful, sometimes tedious process.  But it’s worth it. Slowly begin adding the warm broth/stock to the rice mixture, a 1/2 cup at a time.  Keep stirring and don’t add anymore liquid until what you just added is absorbed.

WP_20141019_009It can take several minutes for each pour. Remember…keep stirring. Expect to spend about 20 minutes to get all the broth incorporated. But when it’s done, you’ll have plump, delicious risotto.  For an extra creamy texture, add in parmesan cheese and stir thoroughly.

WP_20141019_010

Mix in the roasted butternut squash and top it off with a pinch of love.

WP_20141019_013

I served last night’s risotto with maple salmon. Enjoy!

Cooking Club Goes Italian

WP_20140918_007As our October cooking club dinner nears, I realize I never posted September’s dinner.  I hosted in the North End so the natural theme was….Italian.  I cooked up my favorite eggplant recipe, served some yummy Italian wines, grabbed some treats from the neighbor hood and the girls brought delicious contributions to our monthly feast.

WP_20140918_011


MENU

Appetizer: Marinated and stuffed olives

Entrée: Caprese Salad

Eggplant Parmesan

Roasted Vegetable Casserole

Dessert: Ricotta Cookies

Cannolis (from Modern Pastry, Hanover Street)

WP_20140918_012


Eggplant Parmesan

  • 1 eggplant, sliced
  • 1 egg white (in a bowl for easy dipping)
  • Breadcrumbs (on a plate for easy coating)
  • Olive oil (heated in large skillet)
  • 4-5 cloves garlic, chopped
  • Fresh basil, chopped
  • Marinara sauce (choose your favorite)
  • Shredded cheese (Italian blends work great)
  • A pinch of love

Slice the eggplant into discs. Dip each side of the slices into egg white, then into the breadcrumbs.  Place the breaded eggplant slices into a warm skillet with a thin layer of olive oil.  Let the slices brown slightly, then flip. Repeat until all the eggplant is breaded and browned. Watch your arms and clothes, the hot oil can spit out of the pan.

In a small casserole dish, pour a thin layer of sauce on the bottom.  Add a layer of eggplant, sprinkle with chopped garlic and basil, pour another thin coat of sauce and then cheese.  Continue this layering pattern until you’ve used up all the eggplant.  Put a little extra cheese on the very top and don’t forget a pinch of love.

WP_20140205_007

Bake at 350 for about 30 minutes or until the top layer of cheese is melted and lightly browned and sauce is bubbling.

A good time was had by all…even Mason enjoyed himself. WP_20140918_013

Quick Weeknight Chicken Piccata

WP_20140922_008Here at Casa Fisher we’re all about easy-to-prepare meals that can be made ahead of time. In fact, one of us has always worked evenings so cooking meals that can be packed up and reheated are a must. Right now it’s Eric who needs dinner to-go. So I try to make a few things and portion them out in Tupperware early in the week so that the fridge is stocked with healthy meals.

This week, chicken piccata is on the menu and you can make the entire meal in the amount of time it takes to make a pot of pasta.

Chicken Piccata

  •  4 (6-ounce) skinless, boneless chicken breast halves or 1 package of chicken breast tenders
  • 1/4 cup all-purpose flour
  • 1 tablespoon butter
  • 1 tablespoon olive oil
  • 1/2 cup white wine or low-sodium chicken broth
  • 1/4 cup fresh lemon juice
  • 2 tablespoons capers
  • 2 teaspoons minced fresh garlic
  • 1/4 teaspoon salt
  • 1/4 teaspoon freshly ground black pepper
  • Hot cooked pasta of your choice
  • 2 tablespoons chopped fresh flat-leaf parsley
  • A pinch of love

Boil water and prepare the pasta of your choice as you prepare the chicken.

Piccata is usually made with chicken breasts, but we had tenders in the fridge so that’s what I used. If you’re going to use breasts, flatten them in between plastic wrap using a kitchen mallet or rolling pin (or buy the thin chicken cutlets). You want something that is thin enough to cook up in a few minutes.

WP_20140922_001In a large skillet, melt 1 tbsp. of butter with 1 tbsp. olive oil on medium heat. Coat your flattened chicken or chicken tenders in flour and place in the hot pan. Cook the meat for a few minutes on each side until golden brown.When it’s thoroughly cooked, remove the chicken from pan but keep the pan warm.

A brown coating will likely have formed on the bottom of the pan.  Pour in wine or WP_20140922_004chicken broth. This will spit and sizzle so watch your arms and sleeves. Also add in the lemon juice, garlic and capers.  Stir and the brow bits should start to loosen from the pan and the liquid will thicken. Season with salt, pepper and love.

WP_20140922_005

After the sauce has thickened add the meat back in and  stir so it all gets coated.

WP_20140922_006

Once the pasta is cooked, you can either toss in with the chicken or serve the chicken and sauce on top. Garnish with fresh cut parsley and sliced lemon.

Enjoy now or pack it up and save it for dinner later. WP_20140922_007

Thai Curry Mussels

InstagramCapture_e5005233-cf99-4339-a9d4-25ae569376ab_jpgLast weekend, in the last blast of heat, we moved to a new apartment.  We decided to celebrate two days of hard work with a delicious dinner. Mussels are one of my favorites and on a recent trip to Seattle, I had mussels in an amazing Thai curry broth. Seriously, I practically asked the waitress for a straw so that not a drop of broth was wasted. It’s made me wonder, do I actually like mussels, or am I just in it for the bread and broth?

Last Saturday night we cooked up fresh mussels from the local market and tried to recreate the broth. It was a last minute decision and we didn’t have all the ingredients on hand. Neither did Trader Joe’s.  So there was a lot of improvising going on.  It definitely wasn’t the same as the restaurant’s recipe, but the flavors were still incredible and paired with a cold, crisp Prosecco and fresh North End bread, we had ourselves a feast.

Thai Curry Mussels

  • 2 tablespoons peanut oil
  • 1 stalk lemongrass, crushed
  • 3 tablespoons Thai red curry paste
  • 1/2 cup white wine
  • 1 can unsweetened coconut milk
  • 2 tablespoons fish sauce (nam pla)
  • 2 tablespoons fresh lime juice
  • 2 1/2 pounds mussels, debearded and scrubbed
  • 2 tablespoons chopped fresh cilantro stems, plus 2 tablespoons chopped fresh cilantro leaves
  • 4 tablespoons chopped Thai basil or Italian basil leaves
  • A pinch of love

WP_20140906_002In a large stock pot, add the oil, curry paste, wine, coconut milk, fish sauce and lime juice. We didn’t have lemongrass so we omitted (but it does add a delicious flavor if you can find it). Whisk the broth and bring it to a simmer.

WP_20140906_003

While the broth warms, scrub and debeard your oysters.  Carefully pour them into the simmering broth. Cover the pot and let them steam until the shells open.

WP_20140906_004

Throw in the herbs and love in the final few seconds of cooking.

Dish out the mussels and broth into large bowls. Put an extra bowl for shells on the table. Serve with plenty of crusty bread for sopping up the broth.

WP_20140906_005

Enjoy!

Where Has Summer Gone?…A Quick Marinade to Capture the Fading Flavors of the Season

WP_20140811_001

Greetings blog buddies.  It’s been a while.  I can’t believe it’s already the end of August.  It seems like just yesterday we were opening the windows and pouring that first crisp glass of white wine.  Now there are a few crunchy leaves under my feet on morning runs and there is countdown at Starbucks to the day they start serving pumpkin spice lattes (it’s Aug 25 in case you are wondering). Where did summer go?

WP_20140812_001 (1)

I was on vacation for a while and left the blog at home.  Don’t worry, we did plenty of cooking and eating at the beach. The giant bowl of fresh Cape Cod mussels at the top of this post is just one yummy example. Instead of taking the time to write an entry every evening, that hour was spent playing games and building bonfires.  And you know what bonfires mean….s’mores!!!

But now it’s back to work, back to reality and back to the kitchen.  As the sun angle gets a bit lower each day and the evenings come a little bit earlier, I am reminded that summer is fleeting and we need to savor every second and every flavor.  So in the next few weeks I’ll try to pack the blog with delicious summer recipes that will have us thinking of warm days and cool ocean breezes well into the colder days that are sure to come.

This one combines two of my favorite flavors…lemon and basil. It’s compliments of Real Simple. The gigantic, fresh bunches of basil at the farmers market look and smell like summer.  We grabbed a particularly large bunch a few weeks ago and found ourselves googling basil recipes just to ensure we used every last leaf before they wilted.

I like to make my own dressings and marinades.  It helps control the salt and sugar.  Yes, there is probably a good bit of sugar in your favorite bottled dressing.  Food processors make blending easy but you can just as easily chop and wisk the ingredients in a bowl.

Basil-Lemon Dressing/Marinade

  • 1/2 cup basil leaves, packed
  • 1 clove garlic, smashed
  • 1/2 teaspoon kosher salt
  • 2 tablespoons fresh lemon juice
  • 1/3 cup extra virgin olive oil
  • A pinch of love

WP_20140805_004

Put all the ingredients in the bowl of your food processor and blend.  They don’t call it Real Simple for nothing.


I used WP_20140805_005the dressing as a marinade for chicken. I put a package of chicken tenders and the dressing in a Ziploc bag, mixed it around to ensure all the meat was coated and let it sit in the refrigerator for 8ish hours.  You don’t have to let it marinate that long (I prepared it before work). If you plan to use the meat on a salad, reserve a small amount of dressing to serve on top.


Before you cook/grill the chicken, take it out of the refrigerator and bring it closer to room tempWP_20140805_006erature.  Heat up the grill (or grill pan for you urban grillers). If you’re using a pan, you’ll want to spray it to prevent the meat from sticking.  Put the strips of meat directly on the grill/pan. There’s a good bit of oil in the marinade so watch out for the sizzle and spray. Cook the strips for a few minutes on each side. You’ll see the meat change from pink to white. Once the pieces are cooked through, remove them from the heat.


We served ours on hearty sumWP_20140805_007mer salads with homemade toasted sourdough croutons.  They were fresh, delicious, and made for great leftovers the next day at work.

Enjoy!

Roasted Cauliflower and Brussels Sprouts Pizza

WP_20140730_009We make pizza at least every other week.  First of all, it’s delicious. Secondly, it’s a great way to use up whatever ingredients are in the fridge. Did I mention it’s delicious?

For the past few years, we’ve been on the hunt for the best pizza dough. When we were living in Atlanta, we decided Publix had the best dough. But now we live in New England where there are no Publix.  We’ve tried a few of the local bakeries in the North End. Everything Bova’s makes is amazing (the cookies, oh the cookies!!!), so it was no surprise that’s they make a mean pizza crust too. However, the best crust we’ve found in the Boston area is at Russo’s in Watertown. Even after it’s been frozen, the dough is easy to work with and has just enough air to it after it’s baked.  We’re fans of everything at Russo’s, but especially the pizza dough.

Roasted Cauliflower and Brussels Sprouts Pizza

  • 2 handfuls of Brussels sprouts, cleaned and halved
  • 1/2 large head of cauliflower, cleaned and chopped
  • Olive oil
  • Salt
  • Pepper
  • 1/2 large yellow onion, chopped into strands
  • 2 cloves garlic, chopped
  • 1 ball of pizza dough (cold, but not frozen)
  • Flour for rolling
  • Pizza or marinara sauce of your choice
  • Fontina cheese
  • Mozzarella cheese
  • 5-7 fresh thyme sprigs
  • 2 handfuls arugula, washed
  • A pinch of love

WP_20140730_003

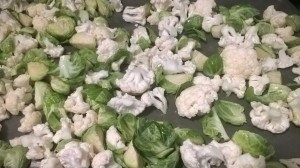
On a cookie sheet, lightly toss the chopped Brussels sprouts and cauliflower with olive oil, salt and pepper. Roast at 425 for 15-20 minutes or until veggies have a golden brown crust. Set aside.

WP_20140730_006 (1)

In a large skillet, warm 2 tablespoons of olive oil. Add in chopped onion and a dash of salt. Cook on medium until onions are translucent.  Add in chopped garlic and roasted veggies. Stir and cook on low while you prepare your dough.

Roll out the dough to the circumference of your pizza stone or tray. I use a little flour on the dough and rolling pin to keep from sticking. Sometimes, to get things started, I pull the dough into a circular shape using my hands, constantly rotating the dough like a steering wheel.

I like to put my pizza stone in the oven while it’s preheating, then cook the dough for a few minutes before adding toppings. This makes for a crispier crust. A dusting of cornmeal on the stone or tray will keep the crust from sticking and make for easier cutting/serving.

After the dough starts to harden on the outside, I quickly remove it from the oven, add a smear of sauce, add my veggies and sprinkle with cheese. You can add as much or as little cheese as you like.  To add a little extra flavor, I added a few springs of thyme leaves on top and sprinkled with love.

WP_20140730_007

Bake at 425 degrees for about 20 minutes, or until the cheese is melted and the crust is cooked through. If you’re cooking on a stone, you’ll want to remove the pizza after it’s out of the oven, otherwise the crust will continue cooking and possibly burn. While the pizza is still hot, add some arugula on top. It gives the pizza a peppery bite. The heat will cook the leaves just enough.

WP_20140730_010

Let cool for a few minutes and serve. This pizza makes great leftovers. I suggest heating it up under the broiler for crispier results. Enjoy!
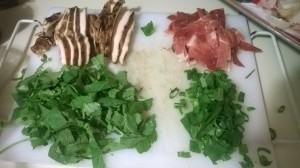