A Tale of Two Bunnies…and Some Delicious Cookies

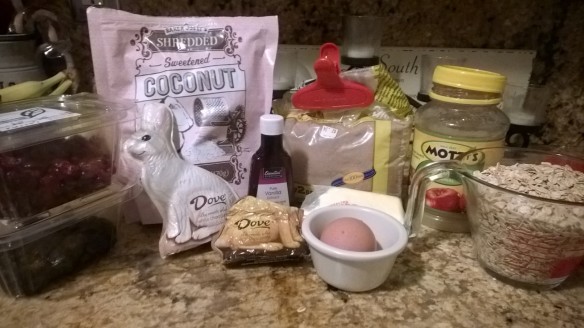
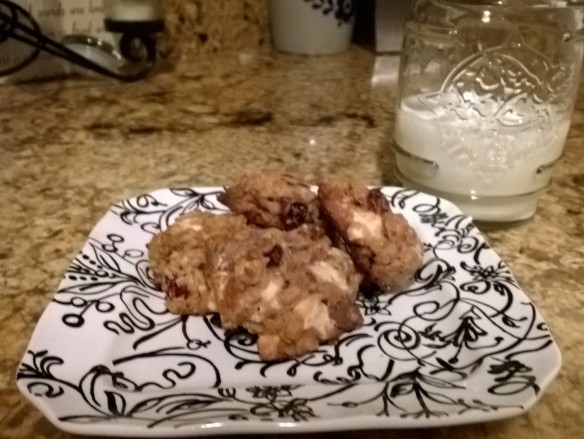
WP_20140428_008Every year the Easter Bunny brings me a white chocolate bunny…and every year I turn it into cookies.  Now, the Easter Bunny leaves treats for Eric and he gets a milk chocolate bunny.  Usually his bunny doesn’t last long enough to meet the mixing bowl.  As you can tell from the pictures, this year Eric’s bunny was decapitated in a late-night snack attack.  But there was still plenty to chop up for cookies…sorry bunnies.

This recipe falls into the “kitchen sink” category, meaning I throw in whatever I have in the pantry.  This time around it was Easter candy, coconut and cranberries….yum!

WP_20140428_005

Oatmeal Chocolate Chip Cookies

  • 1 cup butter, softened (I substituted half with applesauce_
  • 1 1/4 cups packed brown sugar
  • 1/2 cup white sugar (I omitted b/c I had sweetened coconut)
  • 2 eggs
  • 2 tablespoons milk
  • 2 teaspoons vanilla extract
  • 1 3/4 cups all-purpose flour
  • 1 teaspoon baking soda
  • 1/2 teaspoon salt (optional) (I omitted)
  • 3 cups rolled oats
  • 2 cups semisweet chocolate chips (I used white and milk chocolate from leftover Easter candy)
  • 1 cup chopped walnuts (optional) (I omitted)
  • 1 cup shredded coconut (I had sweetened coconut so omitted white sugar)
  • 1 cup dried cranberries
  • A pinch of love

**The above recipe makes 5 dozen cookies so I usually cut in half**

First I chopped the chocolate bunnies into “chip” size pieces.

WP_20140428_010


Mix the room temperature butter (and applesauce if you’re cutting the fat) with sugar(s). Add in eggs, vanilla and milk. Slowly add baking soda and flour.  Once all those ingredients are blended and flour is fully incorporated, it’s time to add the goodies.

Stir in the oats, chocolate chips, coconut, cranberries and a pinch of love.

WP_20140428_012


Using a teaspoon or scooper, scoop out cookies on a greased or lined cookie sheet.  Bake at 375 degrees for 8-10 minutes.  These baked super quick in my oven so keep an eye on yours.

Let them cool but be sure to enjoy one warm…it doesn’t get any better than that.

WP_20140429_009

Seared Sea Scallops and Lemon Asparagus Risotto

WP_20140427_013Not every recipe I make is new. That’s what’s so great about having a tried and true collection of dishes.  You know what works, how long it will take to make and what to expect.  This weekend we had a few extra sea scallops in the fridge so I decided to use them in a delicious risotto recipe I shared on the blog a few months ago. It turned out to be the perfect meal on a chilly, wet Sunday night.

Seared Sea Scallops with Lemon Asparagus Risotto

  • 4-6 sea scallops
  • Butter (enough to coat the bottom of your skillet)
  • Salt and pepper
  • A pinch of love

Melt enough butter (about 2 tablespoons) to cover the bottom of your skillet with a very thin pool.  Get the heat cranking so the butter starts to sizzle.

WP_20140427_002


While the pan is heating up, sprinkle the salt, pepper and love on your scallops.


WP_20140427_004

Place the scallops on the hot pan. You’ll want to use tongs and be careful. The butter will be feisty.  Cook the scallops for 1 1/2 to 2 minutes per side or until a golden brown crust forms.


WP_20140427_007


Set the scallops aside until the risotto is done (or better yet, time them to finish at the same time).


This risotto recipe is one of my favorites. The asparagus, lemon and parmesan cheese melt into the ultimate flavor combination. This is one I always keep handy because it’s delicious any time you’re in the mood for something hearty.

  • 20 fresh asparagus spears, trimmed
  • 4 cups low-sodium chicken broth (use veggie broth if you’re going vegetarian)
  • 2 tablespoons olive oil
  • 1 small onion, diced (or 2 shallots)
  • 1/4 teaspoon ground black pepper
  • 1 clove garlic, minced
  • 1 cup Arborio rice
  • 1/2 cup dry white wine
  • 1/4 cup fresh parmesan cheese
  • 2 tablespoons lemon juice
  • 1/2 teaspoon lemon zest
  • A pinch of love


Steam the asparagus and set aside.  When it’s cool, chop into small pieces.

In a separate sauce pan, warm the broth.

WP_20140208_005In a large, deep skillet, warm olive oil and then add onion (or shallots) and celery (optional). Cook until veggies are tender, approximately 5 minutes. Then add in the rice and stir until lightly toasted, about another 5 minutes. Add in the wine (it will sizzle!) and the garlic. Stir until wine is completely absorbed.

Add warmed broth to the rice one ladle full at a time. No matter how tempted you are, don’t add more liquid until the previous scoop is absorbed. Keep stirring!  It will take 20-30 minutes to get all the liquid incorporated into the rice. You’ll see the rice slowly plump and it will gradually become creamier.  Once you’ve used all the broth, add in the asparagus and stir.

Remove the pan from the stove and add in cheese, lemon juice, lemon zest and a pinch of love.

WP_20140427_009

Either chop the scallops and mix into the risotto (pictured left) or serve the whole seared scallops on top. Pour yourself a crisp glass of white wine and savor every bite of this dish.

Enjoy!


Not Your Average Shrimp Cocktail

WP_20140420_004It’s been one of those weeks when I feel like things have been moving in fast-forward mode.  How did it get to be Thursday night already?  I’ve been meaning to post this recipe for a few days now but the nights have just slipped by.

The Easter menu was a bit unique this year. With Eric running the marathon Monday morning, we wanted delicious, nutritious foods that weren’t too heavy and were easy to digest. For an appetizer I decided to try to recreate a delish dish Eric’s mom made for us once. Instead of serving shrimp with a traditional cocktail sauce, you marinate it in a tangy concoction for a few hours. We weren’t able to get our hands on the exact recipe of the original dish but I think this one came out pretty well…and there were no leftovers, which is always a good sign.

Honey Lime Shrimp Cocktail

  • 1 pound cooked shrimp
  • 1/2 cup olive oil
  • 4 tablespoons honey
  • 6 tablespoons lime juice
  • 4 cloves garlic, minced
  • 1/2 teaspoon salt
  • 1/2 teaspoon black pepper
  • 1/2 teaspoon red pepper flakes (less if you don’t like heat)
  • A pinch of love

WP_20140420_001In a large mixing bowl, combine olive oil, honey, lime juice, garlic, salt, pepper and red pepper flakes.  Mix thoroughly.  Add shrimp and marinade to a Ziploc bag.  Throw in a pinch of love, seal, and mix until all the shrimp is coated.  Refrigerate until ready to serve.  Enjoy!

WP_20140420_002

Quinoa Stuffed Peppers with Feta…no meat required

WP_20140403_013This recipe was a total grocery store improvisation. As I shopped the aisles I decided to make stuffed peppers. Usually I use meat, but when I googled for a recipe, I came across this one from a fellow foodie with a super cute blog.  Any chance to use butternut squash, quinoa and feta sounds like a party to me. The reviews were pretty good and I had most of the ingredients already.  There may not be any meat included, but this is a super filling meal that makes a great leftovers for lunch.

Quinoa Stuffed Peppers with Feta

  • 2 cups butternut squash, cut into 1/2-inch cubes
  • extra virgin olive oil, for drizzling
  • kosher salt and freshly ground black pepper
  • 3/4 cup quinoa
  • 1 (14.5oz) can diced tomatoes, loosely drained
  • 1 zucchini, cut into 1/2-inch cubes (about 1 1/2 cups)
  • 1/4 cup chopped fresh basil leaves, plus more for garnish
  • 1/4 cup crumbled feta, plus more for sprinkling
  • 1 garlic clove, minced
  • 4 large red bell peppers
  • A pinch of love

On a cookie sheet, drizzle olive oil over diced butternut squash and sprinkle with salt and pepper.  Bake at 400 degrees for 20-25 minutes until cubes soften and start to brown. They don’t have to fully cook because they’ll bake again in the peppers.

Cook the quinoa as directed.

While the butternut squash and quinoa are cooking, chop the zucchini, garlic and basil, and hollow out the bell peppers.

WP_20140403_001


Once the quinoa and squash are cooked, mix all the ingredients (minus the bell peppers) in a mixing bowl.  Don’t forget the love.


WP_20140403_003


Put a thin coat of water in the bottom of a pie plate. You might need to take a slight slice off the bottom to get the hollowed peppers to stand up in the dish


Then spoon the filling into the peppers.  Cover with foil and bake for 40ish minutes at 400-degrees. Uncover and then bake for 10 more minutes. Enjoy!

WP_20140403_006

Goat Cheese, Lentil and Brown Rice Wraps…where cooking meets arts and crafts

When you look at the ingredient list to this recipe you might think, “ah, I’ll pass,” but give it a second look. I saw this dish on one of my Food Network binge sessions.  Giada was doing a show on delicious, fulfilling vegetarian meals and she featured this one. It combines a few unique ingredients including Swiss chard, lentils and goat cheese. The flavor combo is great and it’s a good one to make in advance and just pop in the oven when you get home.  I will mention though that this is not a quick meal.  It takes a while to make the filling and assemble the rolls. If you’re short on time save this for another night.

Goat Cheese, Lentil and Brown Rice Wraps

  • 6 large Swiss chard leaves (about 1 1/4 pounds)
  • Salt
  • 2 cups cooked short grain brown rice
  • 1 packed cup baby arugula leaves, chopped
  • 1 cup goat cheese, at room temperature (8 ounces)
  • 1 cup cooked green lentils
  • 1/2 cup chopped fresh mint leaves
  • 1 teaspoon kosher salt, plus extra for seasoning
  • 1/2 teaspoon freshly ground black pepper, plus extra for seasoning
  • 2 cloves garlic, minced
  • One 26-ounce jar marinara or tomato-basil sauce
  • 1/2 cup grated Parmesan (2 ounces)
  • 2 tablespoons olive oil, or unsalted butter diced into 1/4-inch pieces
  • A pinch of love

As the lentils and brown rice cook (separately) wash and cut the Swiss chard leaves down the middle, removing the center stem.

In a large mixing bowl, combine the rice, lentils, arugula, mint, salt, pepper, garlic and goat cheese. Stir until all the cheese is combined. It’s easiest if you mix the filling when the rice and lentils are still hot so the cheese melts a bit.WP_20140407_001

Before you can make the wraps, dip the Swiss chard leaves in a pot of boiling water, keep submerged for about 10 seconds and then lay flat and dry with paper towels.  Then it’s time for the fun to begin and get your hands dirty.  It’s a little like arts and crafts. You spoon a scoop of filling onto one edge of a leaf and then carefully roll. It will look like an oversized grape leave when it’s done.  Repeat until you’re out of leaves or out of filling.

In a pie or casserole dish, pour a layer of marinara sauce on the bottom, then fill with the rolls. If you put the seams facing down, things will hold together better. Once the pan is full, cover the rolls with another layer of sauce.  Sprinkle with parmesan cheese drizzle with olive oil. and seal everything with a pinch of love. You can either cover and refrigerate until you’re ready to cook or pop them in the oven at 350-degrees for about 35 minutes, or until sauce is  warm and bubbling.

WP_20140407_004

This is dish makes great leftovers….which means lunch tomorrow is going to be oh so good.

Enjoy!

Dinner with lots of conversation and very few ingredients…

WP_20140404_004On a rainy Friday night it was once again time to meet up with my fellow foodies to share recipes and lots of conversation.  This month our theme was “5 Ingredients or Less.” Our lovely hostess, Sabrina, served the main dish and some mighty fine wine. We kicked things off with apps and rounded out the evening with desserts straight from heaven. And everything had five ingredients or less. Our one rule/exception: butter/olive oil, salt, pepper and love don’t count.

 MENU

Signature cocktail – Sangria

Appetizers – Roasted beets in puff pastry with goat cheese

Salad – Spinach, strawberries, nuts, vinaigrette dressing

Main Course – Maple Dijon chicken, aka “Man Pleasing Chicken”

Brussels sprouts with bacon

Brussels sprout hash with caramelized scallions

Dessert – Oreo balls

Growing up we never had Brussels sprouts. Green beans, carrots, corn, asparagus…there were lots of veggies, but no sprouts. I have a feeling if Brussels sprouts had been a part of our dinner repertoire, I would have spent some long nights at the kitchen table in a fierce standoff. They’re not my favorite. But now that I am a “grown up” and trying to have a more “grown up” palette, I’ve been working in a few recipes here and there calling for Brussels sprouts.  They’re in season and this is a tasty alternative to roasting or boiling.  They were a hit with the cooking club crowd and with my professional taste tester.  Try them out for yourself. You can definitely taste the love.

Brussels Sprout Hash with Caramelized Shallots

  • 6 tablespoons (3/4 stick) butter, divided (I used about 4 total. It was PLENTY)
  • 1/2 pound shallots, thinly sliced
  • Coarse kosher salt
  • 2 tablespoons apple cider vinegar
  • 4 teaspoons sugar (I used 2 tablespoons)
  • 1 1/2 pounds brussels sprouts, trimmed
  • 3 tablespoons extra-virgin olive oil
  • Water (I didn’t count this as an ingredient)
  • A pinch of love

WP_20140403_009Melt 3 tablespoons of butter on medium heat and add in sliced shallots. Season with a pinch of salt.  Cook, stirring occasionally until shallots are soft and translucent (about 10 minutes).  If they start to burn, turn down the heat.  When the shallots are cooked, reduce heat and add in vinegar and sugar. Stir and set aside.

Wash and trim the sprouts.  Chop in half and then into thin ribbons so it starts to WP_20140403_008resemble slaw.  Warm the olive oil in a skillet and cook the sprouts on medium heat until they start to brown at the edge.  Add in a half cup of water and keep cooking until all the liquid evaporates.  Mix in a tablespoon or two of butter and season with salt and pepper.  Add in a pinch of love and remove from heat.  Mix in the shallots.  You can either serve immediately or let cool and store until it’s time to serve.

WP_20140403_007I made this dish a night ahead of time and warmed it up in the oven for 30 minutes before serving.

Enjoy!