Conquering Food Fears with Whole Wheat Banana Bread

WP_20140219_002I hate bananas. Something happened a long time ago to make me actually fear bananas. I don’t like their texture, their smell; I don’t like being in the same room as bananas. In fact, at snack time one day in kindergarten, my teacher told me I couldn’t go out to recess unless I ate one bite of a banana.  A standoff ensued and I won.

As the years have gone by I’ve made a few concessions.  I no longer run from the room at the first peel. When Eric doesn’t eat a banana before it goes bad, he puts it in the freezer.  Then we accumulate a bunch of frozen, ripe bananas that raise a few eyebrows when guests open our freezer.  As part of my self-induced therapy to overcome my fear, I’ve taken to making banana bread from scratch.  I actually like bananas when they come in bread form.

Full confession, I am still totally squeamish when handling the bananas but the results are worth it.  This is a delicious treat for breakfast or dessert.  I like it warm with a smear of butter and jelly.  The recipe below comes highly rated.  I used whole wheat flour and Greek yogurt to cut the fat and up the nutrition.

Banana Bread

  • 1/2 cup butter (I use 1/4 cup butter, 1/4 cup plain, Greek yogurt)
  • 1 cup sugar
  • 2 eggs, beaten
  • 4 bananas, finely crushed
  • 1 1/2 cups flour ( I use 1 cup whole wheat, 1/2 cup all-purpose)
  • 1  teaspoon baking soda
  • 1/2 teaspoon salt
  • 1/2 teaspoon vanilla
  • A pinch of love

Make sure the butter is room temperature, cream with yogurt and sugar.  Add in the slightly beaten eggs and mashed bananas.  In a separate bowl, sift together the dry ingredients and slowly add to the liquid mix.  Add in the vanilla and a pinch of love. Pour the batter into a greased loaf pan and bake at 350-degrees for one hour. Let cool before taking out of the pan and serving.

WP_20140219_004

Don’t miss out on having a warm slice, fresh out of the oven. Spread with your favorite topping and enjoy!

Black Bean Veggie Burgers

WP_20140213_005When I first started cooking for myself I often kept veggie burgers in the freezer. But I quickly learned that this easy meal is super easy to make from scratch and you can control all the ingredients. No preservatives, less sodium, fresh veggies! You can also add different veggies and spices depending on what you have available and what you’re in the mood for.

Whip up a batch of these black bean veggie burgers, enjoy one hot off the grill (or stove) and freeze the rest for a quick meal some night when cooking just isn’t in the cards.

Black Bean Veggie Burgers

  • 1 16oz. can black beans
  • 4 cloves garlic, minced
  • 1/2 onion or 1 shallot, chopped finely
  • 1/2 red pepper, chopped finely
  • 1 egg
  • 1/2 cup bread crumbs
  • 1 1/2 teaspoons chili powder (use more if you like spice)
  • 1 teaspoon cumin
  • 1/4 teaspoon red pepper (use more if you like heat)
  • salt
  • pepper
  • A pinch of love

Drain and rinse the black beans. In a large mixing bowl, mash the beans with a fork until they form a paste. Add in the rest of the ingredients (including the love) and mix.  It’s that easy. Once everything is incorporated, form four patties.WP_20140213_003

If you’re using a grill, cook the patties on foil. If you’re using a grill pan on the stove, spray the pan first. Cook on medium heat until the patties are warmed throughout and a nice crust forms on the outside.

You can get creative when serving:  Hummus and veggies, caramelized onions and bbq sauce, salsa and cheese…whatever suits your fancy. The burgers also taste great served with eggs for a protein-packed breakfast.

Enjoy!

Maple Brown Sugar Granola

WP_20140210_001One of the household staples I now make from scratch is granola. We were buying several boxes every month and the closer I looked at the nutrition labels, the more I realized this “healthy” start to the day was packed with sugar and calories. By putting on my food police hat and baking our granola myself, I can control the ingredients, eliminate the preservatives, and play around with different flavor combinations. Each batch lasts about a month and I keep a container full at my desk so that I just have to pack a Greek yogurt each morning and I can have a delicious, protein-packed breakfast while I sift through email. This is another recipe you can have some fun with. Use your favorite nuts. I like to include flax and pumpkin seeds if I have them on hand.  Even if you just have the basics, this granola will still be delicious. Shop around your favorite stores to find the best prices on nuts and dried fruit to keep costs down.

Maple Brown Sugar Granola

  • 1/4 cup brown sugar
  • 1/4 cup maple syrup
  • 1 tablespoon vegetable or canola oil
  • 1 tablespoon honey
  • 1 teaspoon vanilla
  • 3 cups quick oats
  • 1 cup cashews, coarsely chopped
  • 1 cup almonds, sliced or coarsely chopped
  • 1 cup pumpkin seeds
  • 1/2 cup flax seeds
  • 2 teaspoons cinnamon
  • 1/2 teaspoon nutmeg
  • 1/2 teaspoon ground ginger
  • 1 cup raisins
  • 1 cup dried cranberries
  • A pinch of love

I like to toast the nuts and seeds while the oven is warming up.  Turn the oven to 285-degrees.  Lay the nuts and pumpkin seeds in a thin layer on a sprayed cookie sheet.  Put the sheet in the oven while oven preheats, but keep an eye on it. A few seconds too long and the nuts will burn.

In a large mixing bowl, combine oats, flax seed and spices. Set aside.

In a small sauce pan, mix brown sugar, syrup, oil and honey on low heat.  I keep the liquid coating to a minimum to reduce the sugar, but if you want sweeter granola or a chunkier texture, double the liquid. Once blended and lightly bubbling, remove from heat and add vanilla.

Add the liquid and nuts from oven to the bowl of oats.  Combine thoroughly to ensure all the ingredients are well mixed. Don’t forget the pinch of love.

Spread the mixture evenly back on the cookie sheet and place in the oven.  It will take about 30-40 minutes to cook.  You’ll want to stir the granola around on the tray using a spatula at least once during cooking to prevent burning.  Once the oats are golden brown, it’s done! After 30 minutes goes by, keep a close eye on the tray.  One minute too long can spell burnt granola.  Your nose will likely tell you when this recipe is done cooking.

Remove from the oven and let cool.  To mix in the dried fruit, either use your hands on the cookie sheet, or return everything to a large bowl and stir. When everything is completely cool, transfer to a large storage bag, Tupperware or glass container to keep fresh. One batch usually lasts us 3-4 weeks.

Enjoy!

Risotto…a creamy, delicious labor of love

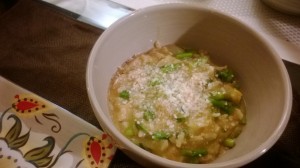
WP_20140208_20_23_48_Pro

Confessions of an Olympics-aholic…I have watched A LOT of hours of the Olympics and we’re just getting started. I can’t get enough. When the games roll around every two years, life stops and I watch.

In between figure skating short programs, short track sprints and giant slalom runs, I’ve managed to do a little bit of cooking.  Over the weekend, we had some lovely guests from Vermont and cooked up a creamy, delicious risotto. Risotto is an incredibly versatile dish that can take on a number of great flavors. This time we opted for a lemon and asparagus. Paired with a great salad, fresh bread and good company, it was a dinner to remember.

The one thing to keep in mind is that risotto is a labor of love…once you start stirring, you can’t stop. Not always ideal when you’re entertaining or orchestrating other elements of the meal. But once you cross the cooking finish line with an amazing dish to share, you’ll be so glad you stayed in the race.

Lemon Asparagus Risotto

  • 20 fresh asparagus spears, trimmed
  • 4 cups low-sodium chicken broth (I used veggie broth to keep vegetarian)
  • 2 tablespoons olive oil
  • 1 small onion, diced (I used  2 shallots)
  • 1 celery stalk (I omitted)
  • 1/4 teaspoon salt
  • 1/4 teaspoon ground black pepper
  • 1 clove garlic, minced
  • 1 cup Arborio rice
  • 1/2 cup dry white wine
  • 1/4 cup fresh parmesan cheese
  • 2 tablespoons lemon juice
  • 1/2 teaspoon lemon zest
  • A pinch of love

Steam the asparagus and set aside.  When it’s cool, chop into small pieces.

In a separate sauce pan, warm the broth.

WP_20140208_005In a large, deep skillet, warm olive oil and then add onion (or shallots) and celery (optional). Cook until veggies are tender, approximately 5 minutes. Then add in the rice and stir until lightly toasted, about another 5 minutes. Add in the wine (it will sizzle!) and the garlic. Stir until wine is completely absorbed.

Add warmed broth to the rice one ladle full at a time. No matter how tempted you are, don’t add more liquid until the previous scoop is absorbed. Keep stirring!  It will take 20-30 minutes to get all the liquid incorporated into the rice. You’ll see the rice slowly plump and it will gradually become creamier.  Once you’ve used all the broth, add in the asparagus and stir.WP_20140208_20_23_41_Pro (1)

Remove the pan from the stove and add in cheese, lemon juice, lemon zest and a pinch of love.  Serve immediately.

Enjoy!

Fresh, Homemade Hummus

WP_20140208_002Another Fisher fridge staple we try to make ourselves is hummus.  We go through a lot of hummus.  It’s our preferred spread on sandwiches and the perfect dip for veggies, chips and crackers. Ever since we received our amazing food processor, I’ve been whipping up batches of hummus almost weekly.  Once you find a basic recipe that you like, you can start experimenting with flavors. I think Ina Garten’s hummus recipe is the best canvas. It calls for very basic ingredients and can be altered depending on what you’re serving and what you’re craving.

I like to serve this fresh with homemade pita chips and the reviews have always been great.

Hummus

  • 4 garlic cloves
  • 2 cups canned chickpeas, drained, liquid reserved
  • 1 1/2 teaspoons kosher salt
  • 1/3 cup tahini (sesame paste)
  • 6 tablespoons freshly squeezed  lemon juice (2 lemons)
  • 2 tablespoons water or liquid from the  chickpeas
  • 8 dashes hot sauce
  • Fresh cracked pepper
  • A few shakes of paprika
  • Fresh chopped parsley
  • Olive oil if necessary for texture
  • A pinch of love

WP_20140208_001In your food processer, mix garlic, chickpeas, salt, pepper and tahini.  Add in the lemon juice, chick pea liquid and hot sauce.  I also like to add a handful of fresh chopped parsley if I have it on hand, along with a few shakes of paprika and a pinch of love.

WP_20140208_003Depending on the texture, you can add in a tablespoon or so of olive oil for a creamier taste. Store this in an air-tight container and it will keep in the refrigerator for a week.

Enjoy!

Ina’s Ultimate Ginger Cookies Live Up to Their Name

WP_20140205_003Homemade desserts…it’s a great way to have sweets on hand but control the ingredients and keep things fresh. At least that’s what I tell myself to feel better about baking cookies. I tried this recipe during the fall and fell in love. Ina Garten, aka the Barefoot Contessa, has the best track record in my book with consistently good recipes. They don’t typically call for crazy ingredients and they’re always delicious.

After a long, snowy day of coverage, Eric came home for a quick dinner date.  I thought he deserved some hot cookies and whipped up a batch of these. After all, it is National Weatherperson’s Day.

These cookies are packed with fabulous flavors: ginger, nutmeg, cloves, cinnamon and, my favorite, molasses. So bake up a batch, pour a glass of milk and enjoy.

WP_20140205_010

Ultimate Ginger Cookies

  • 2 1/4 cups all-purpose flour (I substituted in 1 cup of whole wheat flour)
  • 1 teaspoon baking soda
  • 2 teaspoons ground cinnamon
  • 1 1/2 teaspoons ground cloves
  • 1/2 teaspoon ground nutmeg
  • 1/2 teaspoon ground ginger (used 1 1/2 teaspoons b/c of omission below)
  • 1/4 teaspoon kosher salt (I omitted)
  • 1 cup dark brown sugar, lightly packed (I used light brown sugar)
  • 1/4 cup vegetable oil
  • 1/3 cup unsulfured molasses
  • 1 extra-large egg, at room temperature (I used 2 regular size eggs)
  • Granulated sugar for rolling cookies
  • 1 1/4 cups chopped crystallized ginger (6 ounces) (I didn’t have any so I omitted)
  • A pinch of love

Sift the flour, baking soda and spices and set aside.  In your mixer bowl, blend brown WP_20140205_005sugar, oil, molasses, and egg(s). Slowly add in the sifted dry ingredients until everything is well mixed.  If it seems dry, don’t worry.

To form the cookies, scoop out a heaping teaspoon-sized portion, roll into a ball and then roll in a plate of sugar.  Place on a lined cookie sheet and flatten using a fork or spoon.  Dust with that special pinch of love and pop the tray in a 350-degree oven for 13 minutes.

Let cool for a few minutes before serving. Enjoy!

WP_20140205_013

Read more at: http://www.foodnetwork.com/recipes/ina-garten/ultimate-ginger-cookie-recipe.html?oc=linkback

Eggplant Parmesan

WP_20140205_001I was really hoping for a good old-fashioned snow day today, but alas, I put on my snow pants and boots, bundled up and trudged to work.  So when I got home I was in the mood to do the things snow days are perfect for…including cooking.  And it was an eggplant parmesan kind of night.

Eggplant parm has always been one of my favorites. But when Eric and I first met, he wasn’t a believer. If the “parm” wasn’t preceded by “chicken” or “veal” he wasn’t eating it.  Challenge accepted!  I’ve made an eggplant parm lover out of him and scored another victory in my never-ending mission to get him to embrace vegetarian dishes. In fact, it’s a dish he actually requests. Aside from that special pinch of love, I think the secret to this recipe is the fresh garlic and basil worked into each layer of the casserole.

Eggplant Parmesan

  • 1 eggplant, sliced
  • 1 egg white (in a bowl for easy dipping)
  • Breadcrumbs (on a plate for easy coating)
  • Olive oil (heated in large skillet)
  • 4-5 cloves garlic, chopped
  • Fresh basil, chopped
  • Marinara sauce (choose your favorite)
  • Shredded cheese (Italian blends work great)
  • A pinch of love

Slice the eggplant into discs. Dip each side of the slices into egg white, then into the breadcrumbs.  Place the breaded eggplant slices into a warm skillet with a thin layer of olive oil.  Let the slices brown slightly, then flip. Repeat until all the eggplant is breaded and browned. Watch your arms and clothes, the hot oil can spit out of the pan.

In a small casserole dish, pour a thin layer of sauce on the bottom.  Add a layer of eggplant, sprinkle with chopped garlic and basil, pour another thin coat of sauce and then cheese.  Continue this layering pattern until you’ve used up all the eggplant.  Put a little extra cheese on the very top and don’t forget a pinch of love.

Bake at 350 for about 30 minutes or until the top layer of cheese is melted and lightly browned and sauce is bubbling.

Enjoy! WP_20140205_007

Greek Yogurt Veggie Dip

WP_20140202_002

Veggies are a delicious snack, but let’s be real, they’re even better with dip.  But that dip doesn’t have to ruin your healthy snack. Rather than just using a dressing or sour cream/mayo based dip, the main ingredient in this recipe is greek yogurt.  And it gets better…there’s only one other ingredient. Two ingredients, mix and you’ve got a delicious veggie dip that will last through many a snack attack.

Greek Yogurt Veggie Dip

WP_20140202_004

  • 16oz plain greek yogurt
  • 1 packet of ranch seasoning (I use Hidden Valley)
  • A pinch of love

Mix the yogurt, seasoning and love. You’re done.

I keep it in an air-tight container and it will last at least a week. It might need a quick stir every once and a while. Enjoy!

Smoked Salmon and Goat Cheese Frittata…My Brunch Secret Weapon

The Fishers love a good brunch. Whether it’s just the two of us or we’re entertaining, brunch is always a delicious time. This is an Ina Garten recipe and it’s fabulous.  I particularly like that the whole thing is cooked in one pan and it can be made in advance so you can visit with your guests while it cooks instead of hanging solo in the kitchen. That’s exactly what I did this past weekend when some lovely ladies came for brunch. Did I mention this recipe sounds super fancy but is really super easy? I like to call it my “secret weapon” and I’ve never gotten a bad review.

This recipe already has a nutritional advantage over a quiche because it doesn’t have a fat and calorie-packed crust. I also eliminate the heavy cream and reduce the egg count to eight. If you have any fresh tomatoes, mushrooms or spinach, feel free to throw them in…you can’t go wrong with this one.

My apologies…I forgot to take a picture. I guess I’ll just have to make it again and snap one.

Smoked Salmon Frittata

  • 1 medium onion, diced (I use 2 shallots)
  • 1 tablespoon unsalted butter
  • 12 extra-large eggs (I use 8 whole eggs and occasionally a few egg whites)
  • 1 cup heavy cream (I use a splash of 1% milk)
  • 4 ounces fresh goat cheese, such as Montrachet, crumbled (I use Trader Joe’s)*
  • 1/2 pound smoked salmon, chopped **
  • 3 scallions, chopped, white and light green parts
  • 3 tablespoons chopped fresh dill (Chives work just as well)
  • 1 teaspoon kosher salt
  • 1/2 teaspoon freshly ground black pepper
  • A pinch of love
  • * If you don’t care for goat cheese, feta works well too
  • **Smoked salmon can be expensive and the taste gets overwhelming. To cut down on cost and keep the flavors in check, I typically use one package of smoked salmon (about 5-8 oz.) found in the refrigerator near the fresh fish counter at the grocery store.

Melt the butter in a large oven-safe skillet. Saute the onions/shallots. Crack the eggs and beat with milk in a separate bowl. Slowly pour over the sauteed onions. Add in the goat cheese, chopped salmon, scallions and dill/chives, distributing evenly around the pan. Season with salt, pepper and a pinch of love.

Put the entire pan in a 350-degree oven for 50ish minutes. Bake until the middle is no longer liquid and the top of the frittata starts to brown.

This can sit in a slightly warm oven until you’re ready to serve. Enjoy!
Read more at: http://www.foodnetwork.com/recipes/ina-garten/smoked-salmon-frittata-recipe.html?oc=linkback